This post was originally published in July of 2017, and has been updated with more information and resources, including a solvent cement joint burst test video.
When installing chlorinated polyvinyl chloride (CPVC) piping systems, you have a few different options to join the piping and fittings. Depending on the pipe size, the pipe and fittings can be threaded or flanged together, each offering a strong, durable union. However, for most applications, Corzan® Industrial Systems recommends solvent cement welding.
Solvent cement is not glue. Instead it is a fast, easy installation process that uses solvents and resin to chemically fuse the pipe and fitting together at a molecular level, essentially creating one continuous piece of plastic. In fact, solvent cement is the only joining method recommended for system features like expansion loops because it allows the pipe to bend and move without breaking or weakening the joint seal.
To ensure the solvent cement is applied properly throughout your process system, we've put together the following dos and don’ts to remember throughout the seven step joining process.
If the provided solvent cement installation do's and don'ts are followed, see how reliable the joints become by watching the burst test video below.
CPVC Solvent Cement Welded Joint Burst Test

1. Cutting CPVC
Do: Use tools designed for use with plastic pipe and fittings.
Preferred plastic cutting tools include a ratchet cutter, wheel-type plastic tubing cutter, a power saw, or a fine-toothed saw.
Do: Ensure the CPVC is cut squarely by using a miter box.
Cutting the pipe as squarely as possible provides the maximum bonding surface area. The more surface area that becomes chemically bonded, the more strength the joint will exhibit.
Don’t: Use a dull or broken cutting tool blade.
2. Chamfering and Deburring CPVC
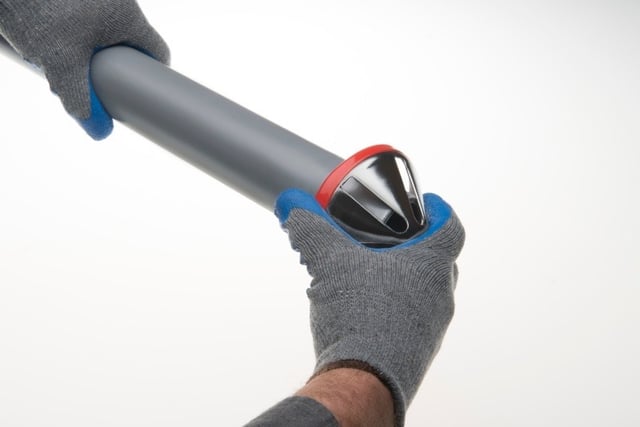
Do: Remove burrs and filings.
Burrs and filings can prevent proper contact between the pipe and fitting and may put undue stress on the pipe and fitting assembly. Use a chamfering tool or file to remove burrs and filings from the outside and inside of the pipe.
Do: Place a slight bevel at the end of the pipe.
A slight bevel eases entry of the pipe into the socket and minimizes the chance of wiping solvent cement from the fitting. For pipe sizes 2 in. and larger, a 10 to 15° chamfer of 3/32 in. is recommended.
3. Preparing the Fitting for Solvent Cement
Do: With a clean, dry rag, wipe any loose soil and moisture from the fitting socket and the pipe end.
Loose soil and/or moisture can slow cure times and reduce the joint strength. Make sure the fit is good by checking that the pipe enters the fitting socket easily 1/3 to 2/3 of the depth.
Note: If the pipe bottoms in the fitting with little interference, try a new fitting.
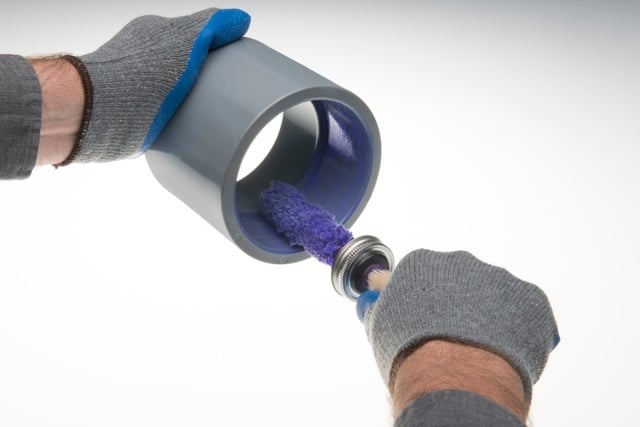
4. Primer Application
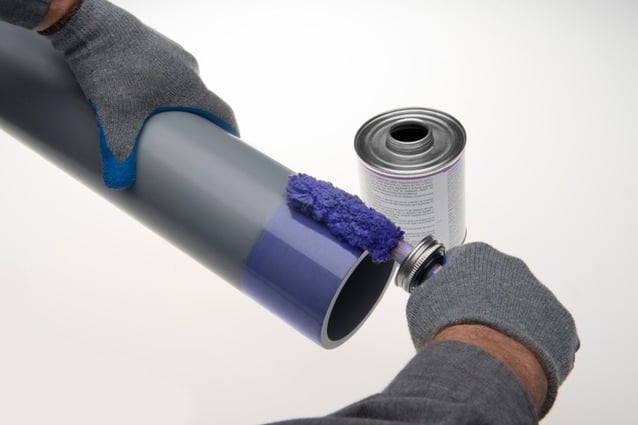
Do: Use primer conforming to ASTM F656 and a proper applicator.
Primer is needed to prepare the bonding area for the addition of cement and subsequent assembly. Use a proper applicator, such as a dauber, swab or paintbrush, approximately half the size of the pipe diameter.
Apply the primer to the inside of the fitting socket and to the outiside of the pipe end. Apply a second primer coating inside the fitting socket. Redip the applicator as often as necessary to ensure the entire surface of both pieces is tacky.
Don't: Use a rag to apply the primer.
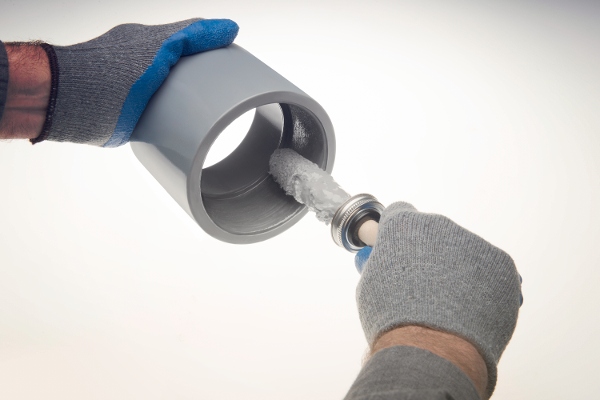
5. Solvent Cement Application
Do: Use only solvent cement conforming to ASTM F493
Contact Corzan® Industrial Systems or the solvent cement manufacturer for recommendations for use with harsh chemical applications.
Apply solvent cement when the pipe surface is tacky (not wet) from primer. The joining surfaces must be penetrated and softened.
Cement should be applied with a natural bristle brush or swab half the size of the pipe diameter. For pipe sizes smaller than 2 in., a dauber may be used.
Apply a heavy, even coat of cement to the outside of the pipe end, and a medium coat to the inside of the fitting socket. For pipe sizes greater than 2 in., apply a second coat of cement on the pipe end.
Don’t: Allow puddling of solvent cement in the fittings and pipe.
Don’t: Use solvent cement near sources of heat, open flames, or when smoking.
Don’t: Use solvent cement that exceeds its shelf life or has become discolored or gelled.
6. Assembly
![]()
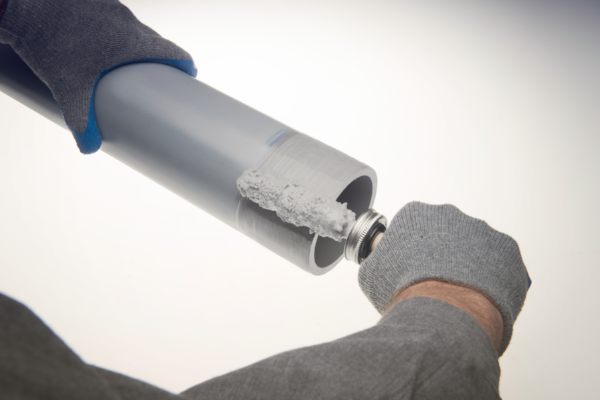
After cement application, immediately insert the pipe into the fitting socket while rotating a 1/8 to 1/2 turn until the fitting-stop is reached. At this time, the fitting should be properly aligned for installation.
The pipe must meet the bottom of the fitting socket. Once in place, the assembly should be held in place for 10 to 30 seconds to ensure initial bonding and to avoid push out.
Do: Check that a bead of cement is evident around the pipe and fitting juncture.
If this bead is not continuous around the socket shoulder, it may indicate that insufficient cement was applied. In this case, the fitting should be discarded and the joint reassembled.
Wipe off any excess solvent cement with a rag.
Do: Use equipment for the joining of a large diameter pipe.
For a 6 in. or larger diameter pipe, a pipe puller (come-a-long) is recommended to assemble the joint and hold it in place for the initial set time without applying excess force that may damage the pipe or fitting.
This equipment should be set up prior to the start of priming so assembly can happen quickly while primer and cement are still fluid.
7. Set and Cure Times
Solvent cement set and cure times are a function of pipe size, temperature, relative humidity, and tightness of fit.
Drying time is faster for drier environments, smaller pipe sizes, high temperatures and tighter fits.
The assembly must be allowed to set, without any stress on the joint, per the time shown in the following tables. Following the initial set period, the assembly can be handled carefully, avoiding significant stresses to the joint.
Do: Follow the recommended set times.
After a joint is assembled using solvent cement, it should not be disturbed for a period of time to allow for proper “setting.” Recommended set times are as follows:

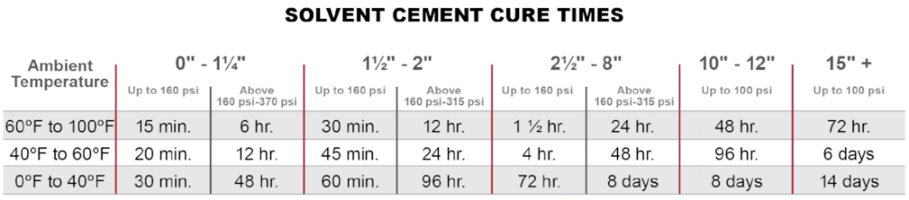
Do: Follow the recommended cure times.
After a joint is assembled using solvent cement, the cement must be allowed to properly “cure” before the piping system is pressurized.
Recommended minimum cure times are shown below. These recommendations should only serve as a guide since atmospheric conditions during installation will affect the curing process.
Note: High humidity and/or colder weather will require longer cure times. Typically add 50% to the recommended cure time if surroundings are humid or damp.
Get the Most Out of Solvent Cement
Different applications and pipe sizes require different solvent cement viscosities. To ensure you choose the correct solvent cement and use it correctly, contact our team of technical and product experts. Or, start with our Complete Solvent Cement Guide.