
Introduction
When installing chlorinated polyvinyl chloride (CPVC) piping systems, there are a few different ways to join the piping and fittings. Depending on the pipe size, the pipe and fittings can be threaded or flanged together, which both offer a strong union. However, for most applications, Corzan® Industrial Systems recommends solvent cement welding because it’s quick, simple, and highly reliable.
Solvent cement is a fast, easy installation process that uses solvents and CPVC resin to chemically fuse the pipe and fitting together at the molecular level. In the end, using solvent cement doesn’t just adhere two pieces together–it creates one continuous piece of thermoplastic. The joint becomes the strongest part of a piping system.
This guide to solvent cement explains:
- What it is
- How it works
- The process for utilizing it in industrial piping applications
- Special considerations for successful installation
What is Solvent Cement?
Solvent cement is made up of CPVC resin, stabilizers and fillers dissolved in a cocktail of solvents. These solvents serve two purposes:
- Dissolve the CPVC resin.
- Prepare the surface of the pipe and fitting.
When applied, the solvents soften and dissolve the top layer of the pipe and fitting material, loosening its molecular structure. A taper in the fitting socket creates an interference fit that ensures contact between the pipe and fitting. This allows the material to fuse to itself when the two pieced are connected.
These fused joints help to maintain the life expectancy, high distortion temperature, pressure rating, chemical resistance, and safety qualities throughout the system.
Solvent Cement is Not Glue
The terms “glue” and “solvent cement” are often used interchangeably with reference to thermoplastic piping installation. On a basic level, both accomplish the immediate goal of joining pipes and fittings. However, the substances are actually very different.
How Glue Works
Glue functions with adhesion and cohesion. When two pieces of pipe are glued together, adhesive forces are those that connect the glue to each piece of pipe. A cohesive force holds the glue to itself.
Glue can be classified as reactive or nonreactive, depending on how it sets.
Reactive adhesives harden through chemical reactions, either as a two-part adhesive (where materials create a chemical reaction, such as with epoxy) or a single-part adhesive (where an energy source, like heat or moisture, causes the glue the harden.)
Nonreactive adhesives require no chemical reaction to harden. Instead, the solution hardens as it evaporates, “sticks” when pressure is applied (like a Post-It® note), or is applied in a molten form and hardens as it cools (like a hot glue gun).
Why Glue isn’t Meant for Joining CPVC Piping
Glue bonds only “stick” materials together, regardless of the type of adhesive. This means that when a strong enough force acts on the adhered area, the bond can break and the joint can come apart.
This makes glue an unreliable choice for industrial piping applications. Using glue would significantly diminish pressure and temperature ratings, and the glue could be incompatible with processing materials. Also, the chemicals within certain glues may actually degrade or weaken the piping material.
The Different Types of Solvent Cement
As we covered above, solvent cements are usually proprietary solutions of solvents, stabilizers, and fillers combined with a resin. Solvent cements are also be distinguished by viscosity.
Solvent cement’s viscosity is determined by the amount of resin it contains. The more resin, the greater the viscosity. And the greater the viscosity, the better the solvent cement can fill gaps within the joint it’s bonding.
Generally speaking, solvent cement viscosity can be classified into one of three categories:
- Regular bodied
- Medium bodied
- Heavy bodied
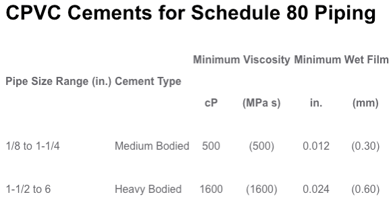
To choose the correct solvent cement category for a particular piping system, follow the ASTM Standard Specification for Solvent Cements for Chlorinated Polyvinyl Chloride (CPVC) Plastic Pipe and Fittings (F493). This standard is based upon pipe diameter, schedule, and application.
The following tables show the appropriate type of solvent cement based upon the size of the pipe.
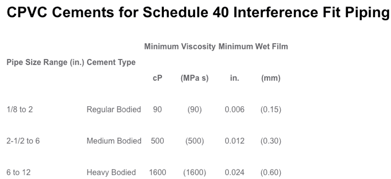
In Industrial Applications, Utilize a Primer
For industrial applications, Corzan Industrial Systems recommends heavy bodied solvent cement solutions. That said, because heavier bodied solvent cements contain more resin, and consequently less solvent, a primer should also be used.
The primer is comprised of additional solvents applied to the pipe and fitting as a first step, which helps soften the material and free the surface molecules. The solvent cement is then applied to further the softening process and create a strong pipe and fitting connection.
In all cases, adhere to the manufacturer’s recommendations to ensure that the solvent cement you choose is correct for your application.
How to Assemble CPVC Pipe and Fittings with Solvent Cement
Cut the Piping
Corzan pipe is easily cut with a ratchet cutter, wheel-type plastic tubing cutter, power saw, or fine-toothed saw—don’t use a dull or broken cutting blade. To ensure the pipe is cut squarely, use a miter box when cutting with a saw. Cutting the pipe as squarely as possible provides the maximum bonding surface area.
Remove Burrs and Filings
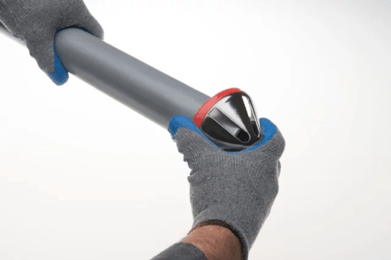
Burrs and filings can prevent proper contact between the pipe and fitting and may put undue stress on the pipe and fitting assembly. For this reason, they must be removed from the outside and inside of the pipe. A chamfering tool or file is suitable for this purpose.
These tools also create a slight bevel at the end of the pipe, which eases entry of the pipe into the socket and minimizes the chances of wiping solvent cement from the fitting. For pipe sizes 2 in. and larger, a 10 to 15° chamfer of 3/32 in. is recommended.
Prepare the Piping for Fitting
Wipe loose soil and moisture from the fitting socket and pipe end with a clean, dry rag. Moisture can slow the curing, and at this stage of assembly excessive water can reduce the joint strength.
Check the dry fit of the pipe and fitting. The pipe should easily enter the fitting socket to 1/3 to 2/3 of the depth. If the pipe bottoms in the fitting with little interference, use extra solvent cement to prepare the joint.
Apply Primer
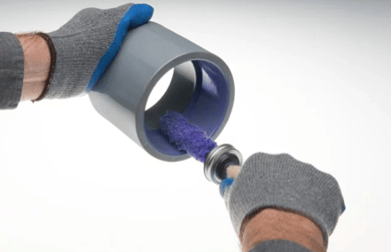
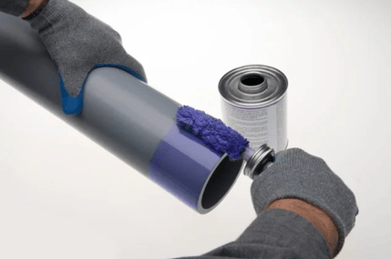
Use primer conforming to ASTM F656. Primer is needed to prepare the bonding area for the addition of the cement and subsequent assembly.
It is important that a proper applicator be used. A dauber, swab or paintbrush approximately half the size of the pipe diameter is appropriate. A rag should not be used.
Primer is applied first to the inside of the fitting socket, then to the outside of the pipe, and finally, to the inside of the fitting socket again. Redip the applicator as necessary to ensure that the entire surfaces of both are tacky.
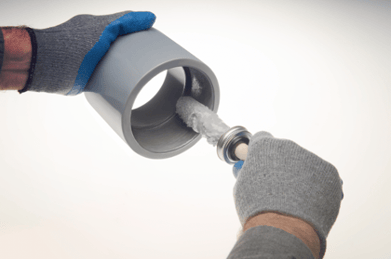
Apply Solvent Cement
For most applications, use only solvent cement conforming to ASTM F493. Contact Corzan Industrial Systems or the solvent cement manufacturer for recommendations for harsh chemical applications. In general, don’t use solvent cement that has exceeded its shelf life or has become discolored or gelled, and don’t apply solvent cement near an open flame, source of heat, or while smoking.
Solvent cement must be applied when the pipe surface is tacky–not wet–from primer. The joining surfaces must be penetrated and softened.
Similar to primer, solvent cement should be applied with a natural bristle brush or swab half the size of the pipe diameter. A dauber may be used to apply cement on pipe sizes below 2 in. Don’t allow the solvent cement to puddle within the fittings and pipe.
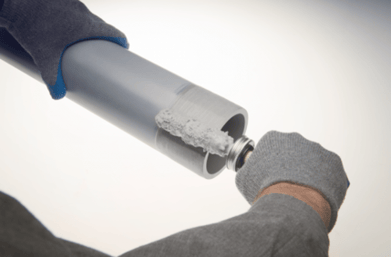
Apply a heavy, even coat of cement to the outside of the pipe end, then a medium coat to the inside of the fitting socket. Pipe sizes greater than 2 inches should receive a second coat of cement on the pipe end.
Assemble the Pipe and Fitting
Immediately after cement application, insert the pipe into the fitting socket and rotate 1/8 to 1/2 turn until the fitting-stop is reached. The fitting should be properly aligned for installation at this time, and the pipe must meet the bottom of the fitting socket.
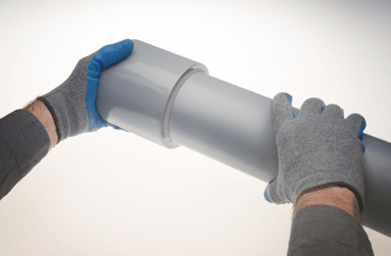
Then, hold the assembly in place for 10 to 30 seconds to ensure initial bonding and to avoid push-out.
A bead of cement should be evident around the pipe and fitting juncture. If this bead is not continuous around the socket shoulder, it may indicate that insufficient cement was applied. In this case, the fitting should be discarded and the joint reassembled. Cement in excess of the bead may be wiped off with a rag.
How to Join Large-Diameter Pipe
For pipes 6 in. or larger in diameter, a pipe puller (come-a-long) is recommended to assemble the joint and hold it in place for the initial set time without applying excess force that may damage the pipe or fitting. Set up this equipment prior to the start of priming so the assembly can happen quickly while primer and cement are still fluid.
Solvent Cement Set and Cure Times
Once assembly is complete, the newly fused CPVC molecules harden as the solvent flashes off, or evaporates. When all the solvent is gone, the joint is considered fully cured, and you’re left with one uniform piece of CPVC.
Solvent cement set and cure times depend on pipe size, temperature, relative humidity, and tightness of fit. Drying time is faster for drier environments, smaller pipe sizes, high temperatures, and tighter fits.
The assembly must be allowed to set, without any stress on the joint, per the time shown in the following tables. Following the initial set period, handle the assembly carefully, avoiding significant stresses to the joint.
Note: Corzan® Industrial Systems always recommends checking the solvent cement manufacturer’s label for recommended set and cure times.
Recommended Set Times
After assembling a joint with solvent cement, do not disturb it for a period of time to allow for proper “setting” of the newly prepared joint. Recommended set times are as follows:

Recommended Cure Times
After a joint is assembled using solvent cement, the cement must be allowed to properly “cure” before the piping system is pressurized. Recommended minimum cure times are shown below. These recommendations should only serve as a guide, because atmospheric conditions during installation will affect the curing process.

How to Properly Utilize Solvent Cement in Hot Weather
In hot environments, solvent cement and CPVC molecules speed up, creating potential challenges for installers. However, reliable CPVC joints can be solvent cement welded at temperatures exceeding 95°F (35°C).
When applying solvent cement to pipes and fittings in high temperature environments, our partner manufacturer Weld-On recommends the following tips:
- Direct sunlight can increase the surface temperature of the material by 20° – 30°F (10° – 16°C), so keep the piping, fitting and solvent cement in the shade as much as possible.
- If possible, create bonds during the cooler parts of the day (morning or evening).
- Cool down joints with a wet rag before applying solvent cement. However, make sure the joint surfaces are dry at the time the solvent is applied.
- Shake and mix the solvent cement well before applying to ensure a consistent mixture.
- Solvents attack hot surfaces faster and deeper than they do average or cold surfaces, so be extra careful to avoid puddling inside the joints.
- Because solvent evaporates more quickly in high temperatures, make sure the joint surfaces are still wet with solvent when connected. Otherwise, the solvent will not properly untangle the CPVC surface molecules.
Warm Weather Set and Cure Times
After applying the solvent cement and assembling the pipe and fitting, allow proper time for setting. During the set time, do not move the pipe. Consult the table below for recommended set times based on temperature and pipe size:
Once set, the pipe and fittings can be moved, but the joint must fully cure before the system can be fully pressurized. The table above, in the “Recommended Cure Times” section, details cure times by temperature and pipe size.
Allow Longer Set and Cure Time in Humid Environments
The more humid an environment, the less available space is in the air for the solvent to evaporate. In general, pipes in environments that are humid or damp should cure for an extra 50% of the given time. So, if the table above recommends 15 minutes, the pipe should cure for a minimum of 22.5 minutes.
How to Properly Use Solvent Cement in Cold Temperatures
In cold weather, pipe and fittings are more resistant to solvent penetration. This means solvents penetrate and soften the pipe and fitting surfaces more slowly than in warm weather. An aggressive primer may need to be used to adequately pre-soften the surfaces.
Key tips for cold weather solvent cement welding from solvent cement manufacturer Weld-On include the following:
- Prefabricate as much of the system as possible in a heated space.
- Store cements and primers in a warmer area to ensure they remain fluid.
- Take special care to remove moisture from the ends of the pipe.
- Use the most aggressive available primer before applying cement.
- Vigorously shake or stir the cement before use.
Cold Weather Solvent Cement Cure Times
Similarly to warm temperatures, cold temperatures require extra time for the joint to cure. Weak joints can result if the system is pressure tested or put into operation before the joint has fully cured, causing issues within the system, specifically leaks. Reference the table above, in the “Recommended Cure Times” section, for recommended cure times based on temperature and pipe size.
Get Started with CPVC
Solvent cement welding is a reliable method for joining CPVC pipes and fittings in most industrial applications. To discuss the specifics of solvent cement in relation to your next project with the Corzan Industrial Systems product engineering team, contact us today.

Download as a PDF
Prefer to read this article as a PDF?

