
Solvent Welding: 6 Steps to Reliable Piping Systems
No torches. No welding. Just a reliable, long-lasting connection you can trust.
Corzan pipes and fittings are joined with a method called “solvent welding,” which uses chemistry and geometry, rather than heat, to produce a permanent molecular bond.
The two-step solvent-welding process is fast and easy. Local codes determine which method is acceptable in your area, but the two-step method is more commonly used in the U.S.
Here is an overview of the solvent-weld process.
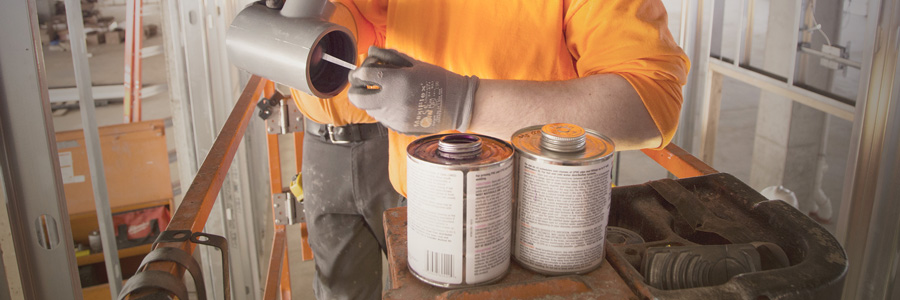
Before you begin, ensure pipes and fittings are at the same temperature. For proper solvent welding of Corzan pipe and fittings, the primer and cement dauber should be no less than half the size of the pipe for sizes 3” and below. Larger sizes require the use of a swab.
Cut the pipe
Start by cutting the pipe using ratchet cutters, wheel cutters or a fine-tooth saw. For previously installed Corzan pipes and fittings, however, avoid use of ratchet cutters as these may compromise the integrity of the repair. If any indication of damage to the pipe is visible at the piping end, cut back at least 2” beyond the visible damage.
Prep the pipe and fittings
Prepare the pipe and fittings by removing any burrs or filings and beveling the end of the pipe using a chamfering tool. If a chamfering tool is not available, a sharp knife or file is suitable, but not preferred.
Wipe away any dirt and moisture from the joint surfaces using a clean, dry rag,
Finally, check the fit of the pipe and fitting; the pipe should make contact with the socket wall one-third to two-thirds of the way into the fitting socket. If the pipe goes all of the way into the fitting at this stage, discard the fitting.
Apply the Corzan solvent primer
Apply Corzan solvent primer in a heavy, even coat inside the fitting socket, keeping the surface and applicator wet until the surface has been softened. Then, drain any puddles of primer from the fitting socket. Next, apply the primer onto the end of the pipe 1/2″ beyond the depth of the fitting socket. Then for a second time, work a second coat of primer into the fitting socket.
Ensure proper coverage of cement on the pipe and fitting. Too little solvent cement can result in gaps and leak paths, and too much solvent cement may puddle in the fittings and/or pipe, softening the material.
Apply the Corzan solvent cement
Next, apply Corzan solvent cement in a heavy, even layer on the pipe end, then apply a medium layer of solvent cement into the fitting socket. Apply a second, heavy layer of solvent cement to the pipe end.
Assemble the joint
Immediately after applying solvent cement, assemble the joint by inserting the Corzan pipe into the fitting in one smooth action, until the pipe is completely to the fitting stop. On sizes 2″ and below, rotate the pipe one-quarter to one-half turn while inserting to ensure even distribution of cement. Properly align the fitting and hold the assembly for approximately 30 seconds, allowing the joint to set.
Verify proper installation
The last step is to verify that the joint has been properly installed. An even bead of cement should be visible around the joint; if this bead is not visible, it may indicate that solvent cement was not properly applied. In this case, disassemble and remake the joint to ensure system integrity.
Dry-fits are extremely rare and completely avoidable with proper installation practices. Verifying the presence of a continuous solvent cement bead at the fitting is a critical step to ensure system integrity.
These directions are an overview of the instructions created by the Plastic Pipe and Fittings Association. Before any installation, please confirm the correct instructions from the manufacturer and any local codes.
To see these steps in action, learn more here.