Corzan® CPVC piping can be installed both above and below-ground.
Any metal or non-metal piping system is subject to stress-induced corrosion. As a result, special attention should be given to minimizing stress throughout the system. The total stress on a piping system includes not only the known pressure stress but also stresses from sources such as expansion or installation. Expansion stresses can be minimized with expansion joints or loops and with careful burial practices.
Hangers and Supports
Hangers and supports should be properly spaced to prevent sagging. In addition, hangers and supports should not have rough or sharp edges that could cut into the pipe. Avoid over-tightening clamps and supports, as this will reduce system movement and contribute to system stress. Never force system components into place.
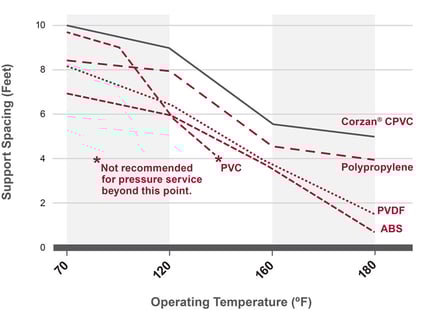
Support spacing recommendations are based on straight runs of uninsulated lines conveying fluids with specific gravities up to 1.0. Heavy system components such as valves, flanged assemblies, tees and other forms of concentrated stress loads must be independently supported.
For specific gravities greater than 1.0, the support spacing from the table provided should be multiplied by the following correction factors:

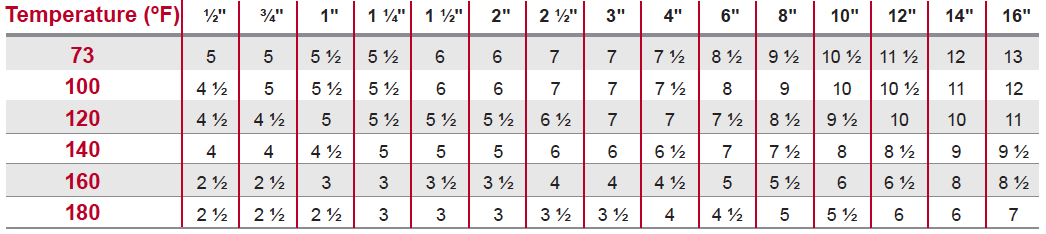
Maximum Support Spacing (ft.) Schedule 80
-1.png?width=1042&name=Maximum-Support-Spacing-Schedule%20(1)-1.png)
Support Spacing for 6-Inch Diameter, Schedule 80 Thermoplastic Systems
Maximum Support Spacing (feet) Schedule 40
Pipe Hangers, Clamps and Supports
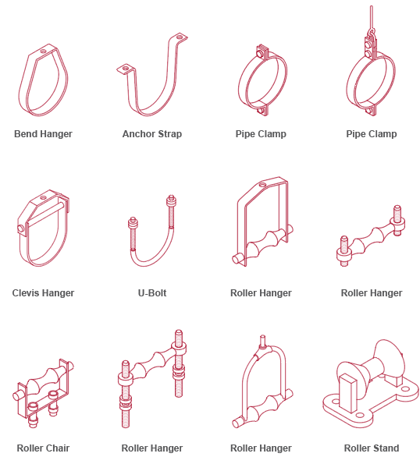
Horizontal Installation: Corzan piping should not be anchored tightly to supports but rather secured with smooth straps or hangers that allow for movement caused by expansion and contraction. Hangers should not have rough or sharp edges.
Vertical Installation: Vertical runs of Corzan piping should be supported by pipe clamps or by hangers located on the horizontal connection close to the riser. Only use hangers and straps that will not distort, cut or abrade the piping. Maintain vertical piping in straight alignment with supports at each level, plus mid-story guide for pipe sizes 2 inches and smaller, or as specified by the design engineer to allow for expansion/contraction.
Underground Installations
Trench design should include considerations of the following:
- Width: The trench should be of adequate width to allow for convenient installation, but as narrow as possible, depending on whether the piping will be assembled inside or outside of the trench.
- Depth: The trench depth should be sufficient to place the pipe deep enough to meet frost, above-ground load, and any trench bedding requirements.
- Frost: Piping should be installed at least 12 in. below the frost line.
- Loads: Piping should be deep enough to keep external stress levels below acceptable design stress.
- Bedding: Design stress will be determined by pipe size and operating temperature and may be governed by various codes.
Trench Preparation: The trench bottom should be continuous, relatively smooth and free of rocks. If ledge rock, hardpan, boulders or rocks that are impractical to remove are encountered, the trench bottom should be padded to protect the piping from damage. In such situations, 4- to 6-inch of tamped earth or sand bedding will be sufficient.
Piping Assembly and Placement: Piping may be assembled using conventional solvent cementing techniques either inside or outside of the trench, depending on the specific installation requirements. During the critical curing process, every effort should be made to minimize stress on any joints. The piping should not be moved during the curing period, nor should the pipe be backfilled or otherwise constrained during curing. If the piping was assembled outside of the trench, it may be placed into the trench after proper curing but absolutely cannot be rolled or dropped into place. Long lengths of joined piping should be properly supported as the piping is put into place to prevent unnecessary stress.
After proper curing but before backfilling, the piping should be brought to within 15°F (-9.4°C) of the expected operating temperature. Backfilling can proceed while the piping is maintained at this temperature to minimize stress on the system caused thermal expansion and contraction. If this step is impractical, stress calculations must be done to determine the loads that will be created due to constrained thermal expansion and contraction. These loads must then be compared to the design stress of the particular piping system.
Backfilling: Backfill material should be free of rocks and have a particle size no greater than 1/2-inch. Piping should initially be surrounded with backfill to provide between six and eight inches of cover. The backfill should be compacted using vibratory or water flooding methods. If water flooding is used, additional material should not be added until the water flooded backfill is firm enough to walk on. Backfill containing a significant amount of fine-grained material such as silt or clay should be hand or mechanically tamped.
The remainder of the backfill should then be placed and spread in near-uniform layers to completely fill the trench without voids. Particle size for this final fill should not exceed three inches. Rolling equipment or heavy tampers should only be used to consolidate the final backfill.
Get Customized Training on Installing Corzan CPVC
We know every project made with Corzan CPVC is unique. Fill out the form to discuss and schedule customized training.
Submit the form and an expert will be in touch within one business day.